This writing started with a question that popped into my mind. How do Apple's built-in apps like Notes, Reminders, and Photos work on the web, even though their data is private and stored in the user's iCloud account?
The answer, it turns out, is CloudKit. CloudKit is a database framework created by Apple. But it's not only made to store data — CloudKit also has a “local-first” principle. This means data is first saved locally on Apple devices, which can then be synced to the CloudKit database. CloudKit offers 2 database types:
- CloudKit Private Database: A secure and private data storage within the user's iCloud account. It's suitable for apps that store personal data like Apple Notes, Reminders, and Photos.
- CloudKit Public Database: Public data storage that is not tied to any specific iCloud accounts. So everyone can access it. It's suitable for apps with publicly consumed data like the Apple App Store, music you can listen to on Apple Music, or movies and series on Apple TV (these are just some example use cases, not actual data)
In this post, I will focus on covering the CloudKit Private Database. I will share my personal experience and a little detail on how to integrate CloudKit with web applications. Although I use Next.js, the code is just a regular JavaScript code that can be used in other frameworks.
Table of Contents
- Prerequisites
- Start
- Step 1 — Accessing CloudKit Console
- Step 2 — CloudKit API Key
- Step 3 — Integrating CloudKit Web Services
- Conclusion
Prerequisites
- You have an active Apple Developer Account. The membership fee is $99 USD per year.
- You have already developed or are currently developing an app for an Apple platform (iOS, macOS, or others) that's configured to use CloudKit.
- You are familiar with JavaScript and Next.js
Start
Apple provides several ways to access CloudKit data with JavaScript. Here are some methods:
- CloudKit Web Services - This is the method we will be using. It's an API service provided by Apple to access CloudKit. In my opinion, this is currently the best option.
- CloudKit.js - A JavaScript library provided by Apple. However, this library is no longer updated & maintained by Apple anymore, so some people advise against using it (see an example).
- CKTool JS - A Node.js library released by Apple in 2022. However, this library is more focused on building CloudKit automation (see an example).
Step 1 — Accessing CloudKit Console
The first step we need to take is to make sure that we can view the previously configured CloudKit container. Here's how:
- Open the CloudKit Console — icloud.developer.apple.com/dashboard.
- Log in using your Apple Developer Account.
- Click on "CloudKit Database".
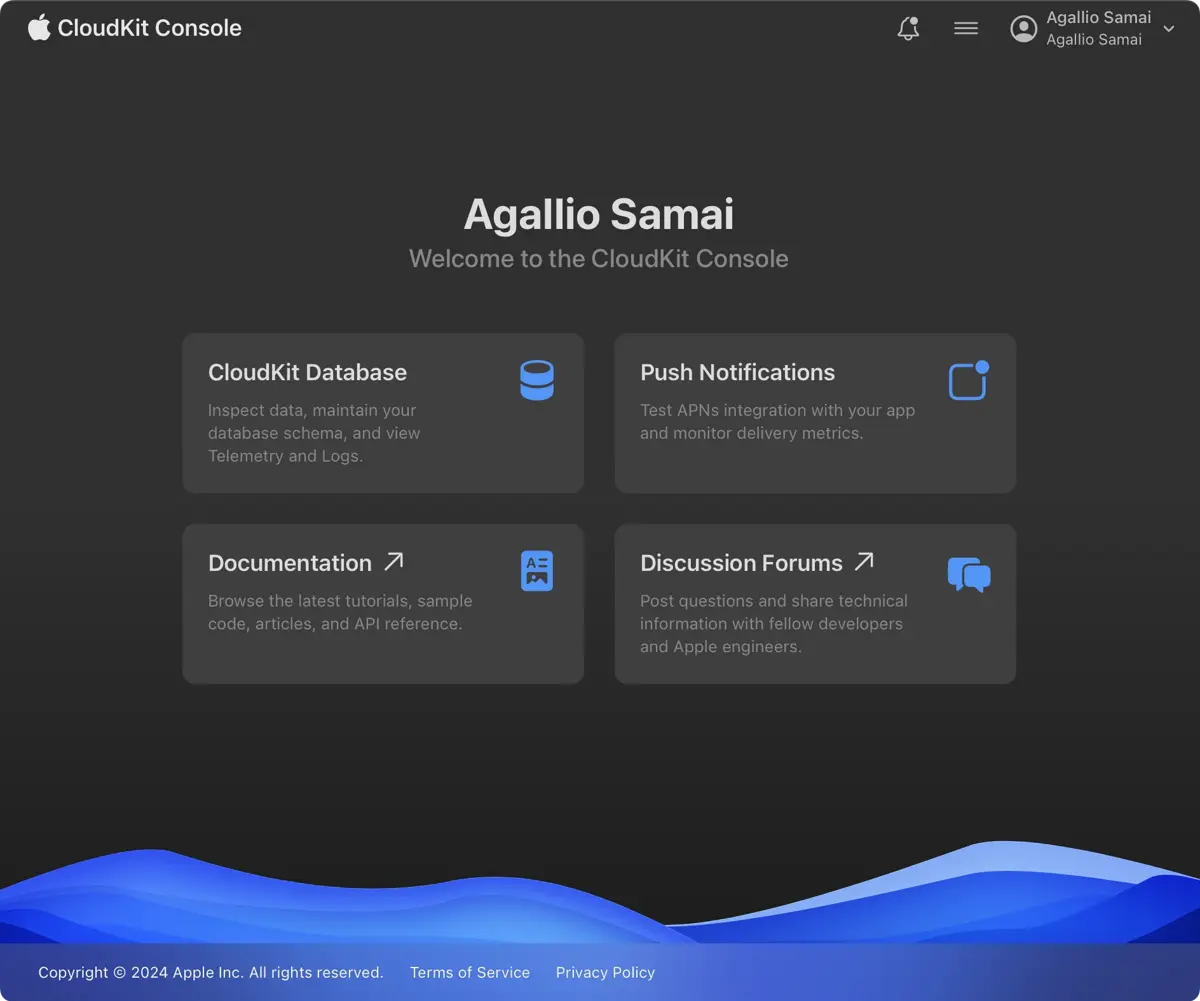
- If you see a screen like this, it means you have successfully accessed the CloudKit Console.
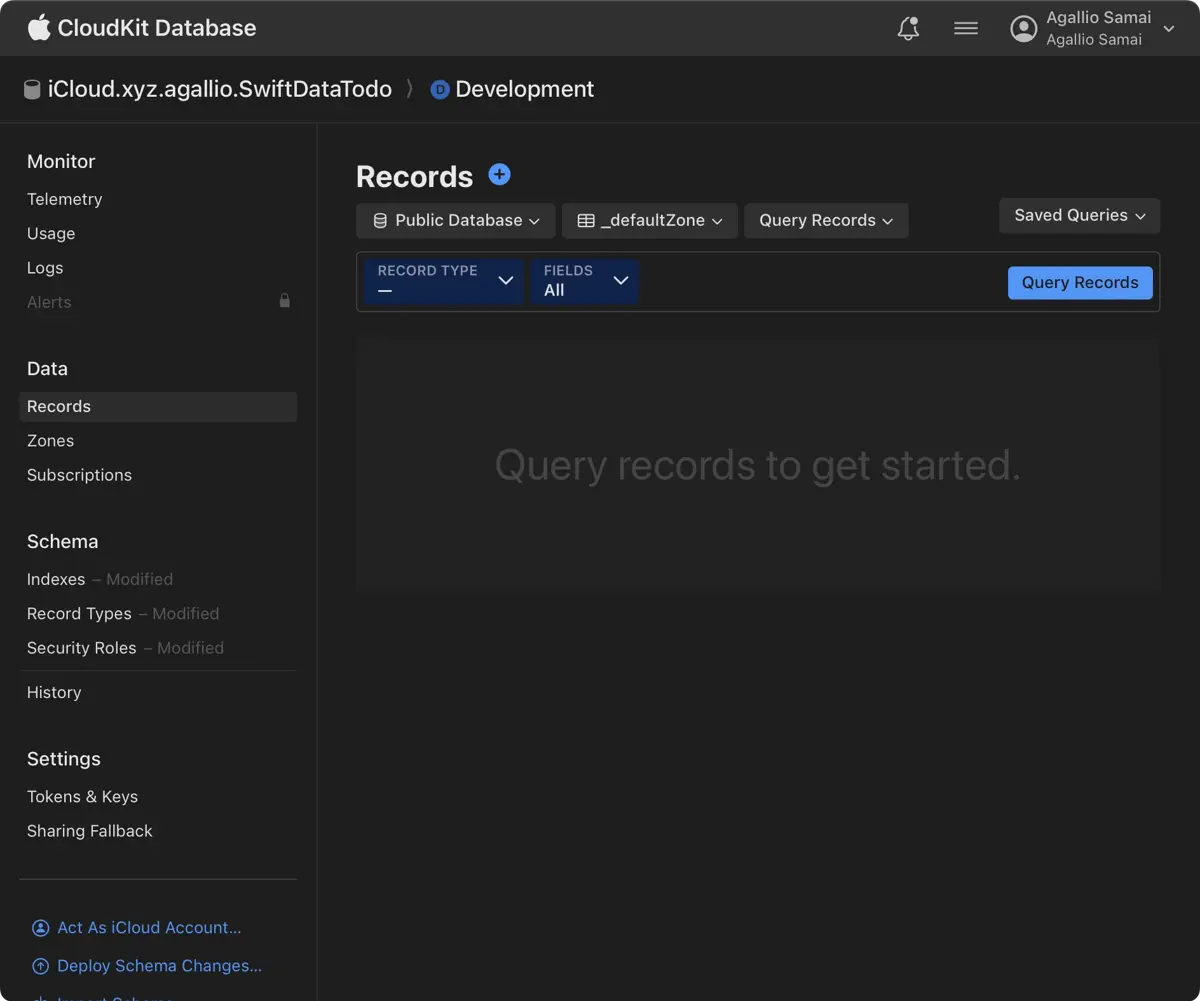
- Use the dropdown in the top left corner to select the project you want to access. This dropdown will show all of your app's bundle IDs that are integrated with CloudKit.
Enabling Query
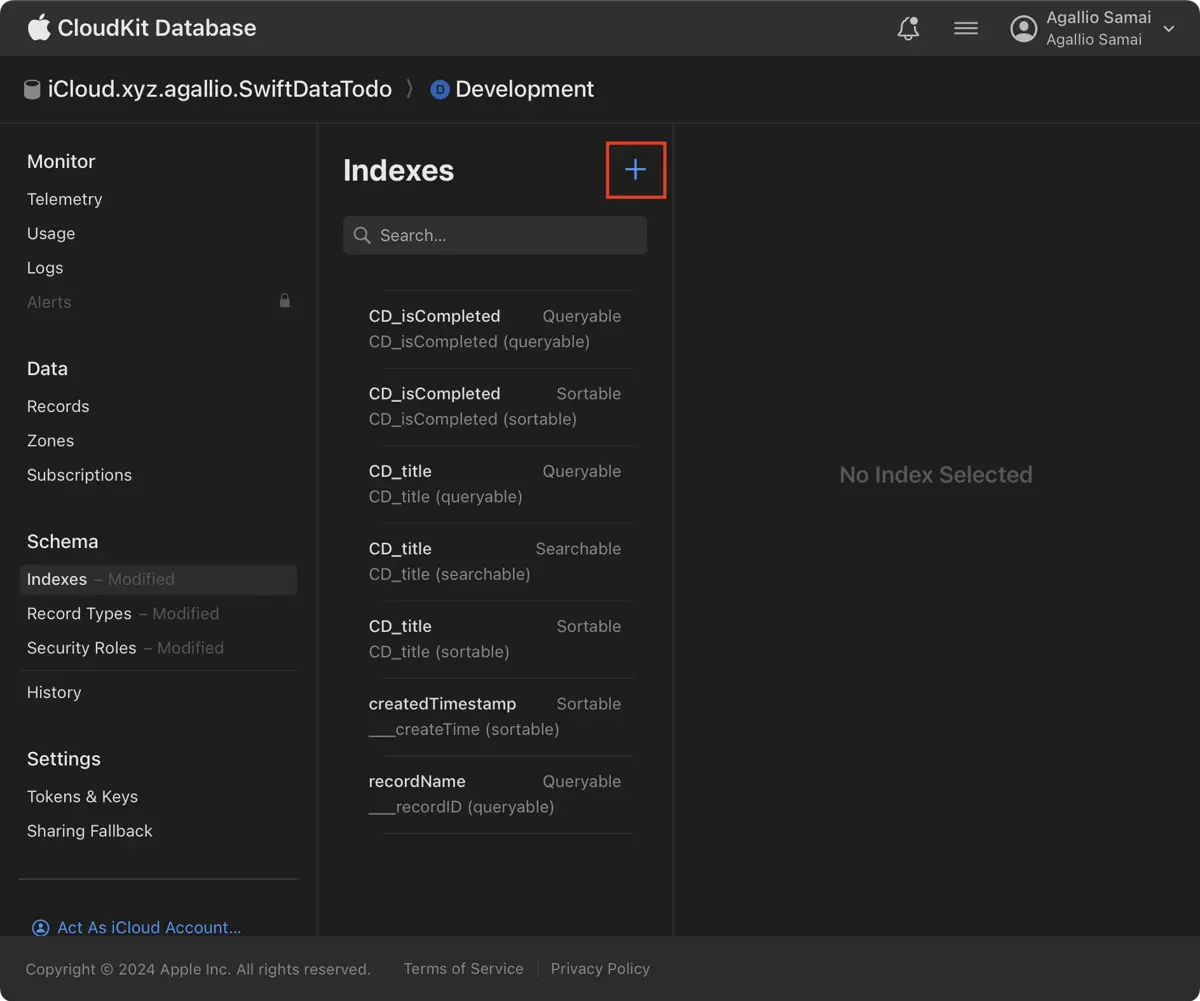
Next, we need to add a new index to the table schema so we can query the table.
-
Select the "Schema" → "Indexes" menu.
-
Make sure you see a list of pre-existing indexes. Usually, these items have a format like
CD_<column_name>. -
Once you see this, click the plus button at the top.
-
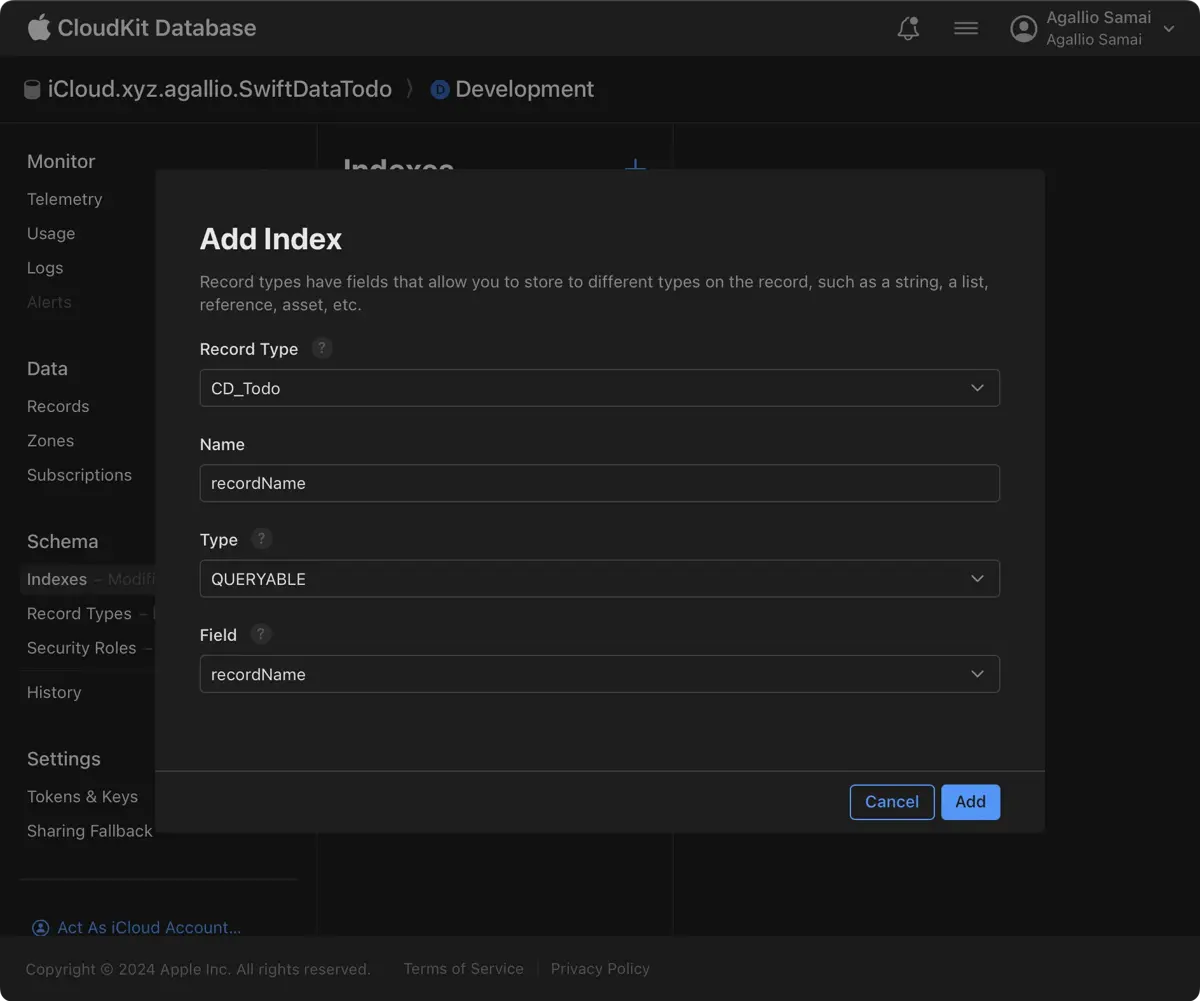
Then fill out the form as shown in the image below.
- Record Type - Choose the table you are using.
- Name - Fill in with an easy-to-remember name. I usually use the same name as the
Fieldbelow. - Type - Select
QUERYABLEso we can query our table from the CloudKit Console. - Field - Choose
recordNamefrom the dropdown.
Trying Out a Query
After enabling the query, we need to make sure we can perform a query from the CloudKit Console.
-
Select the "Data" → "Records" menu.
-
Set up the options to perform a query:
- Database: Select "Private Database".
- Record Zone: Select "com.apple.coredata.cloudkit.zone". This is the record zone created by CoreData or SwiftData when we integrated them into our native apps.
- Record Type (blue option below the Database option): Select the table you want to query. In this project, the table is
CD_Todo.
Once everything is selected, click on the "Query Records" button.
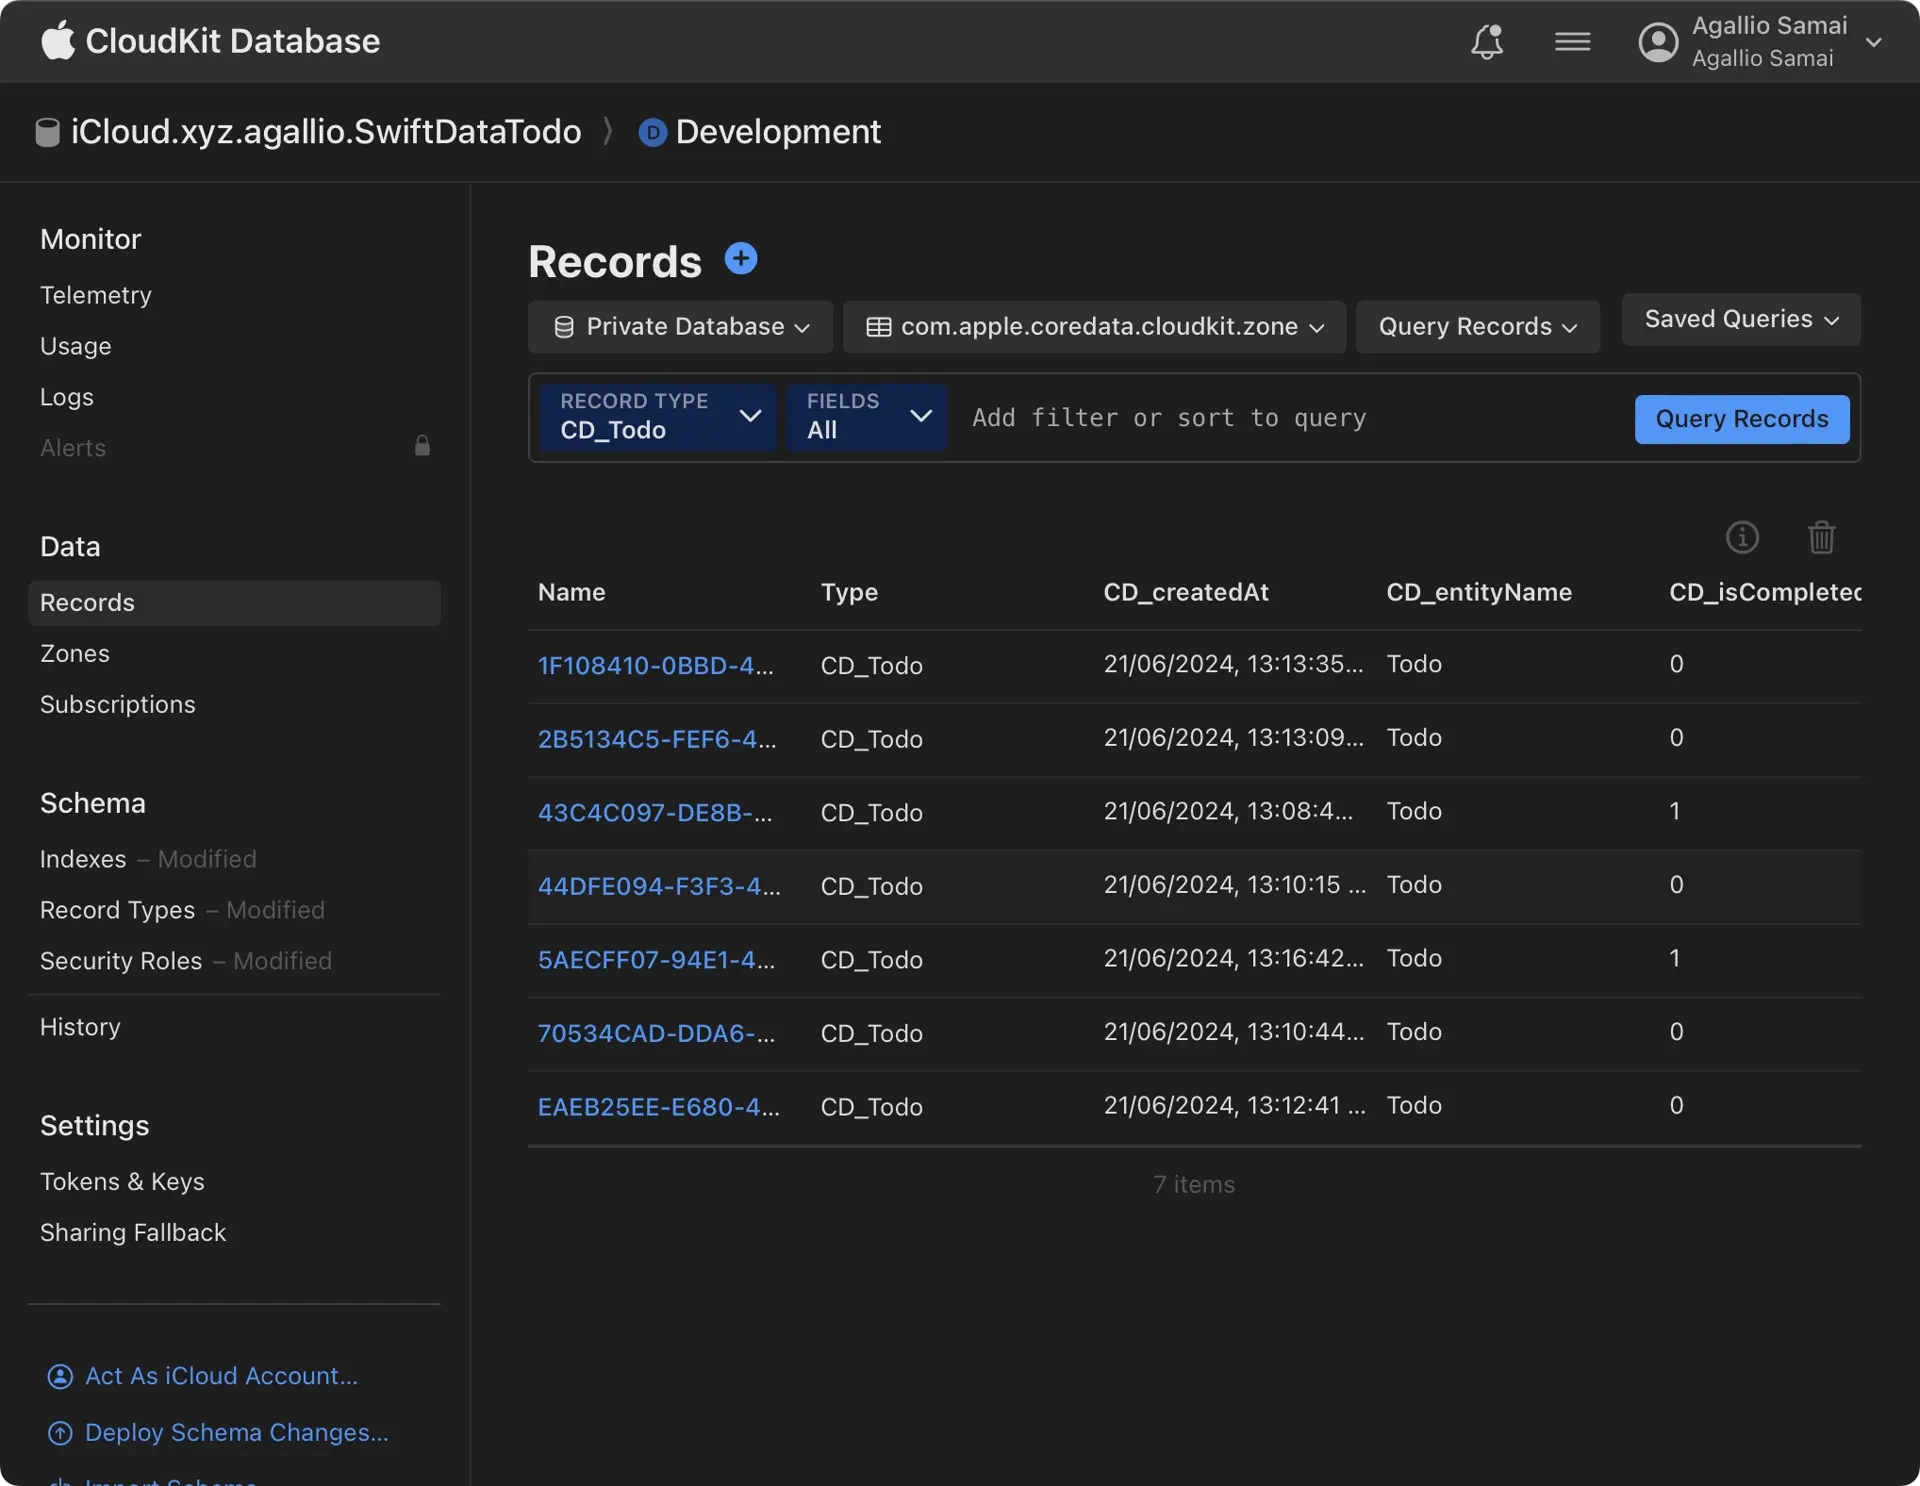
The query result will vary depending on how much data you have. If you haven't added any data yet, it will show an empty state. But if you have, it will look something like the image above.
After you have successfully performed a query, you can also modify the data directly from this dashboard if needed.
Step 2 — CloudKit API Key
To access CloudKit from a web application, we need to create an API key.
-
Select "Settings" → "Token & Keys" menu, then click on the plus icon next to "API Tokens".
-
Fill out the API key form:
- Name - Fill in with an easy-to-remember name, for example “Next.js API Key”.
- Sign in Callback
- Select the "URL Redirect" option, then on the dropdown choose, "localhost".
- Enter your localhost port (Next.js runs on port
3000by default). - Fill in the URL path, in this example I use
/api/auth/callback.
- Select the "URL Redirect" option, then on the dropdown choose, "localhost".
Leave other options as-is.
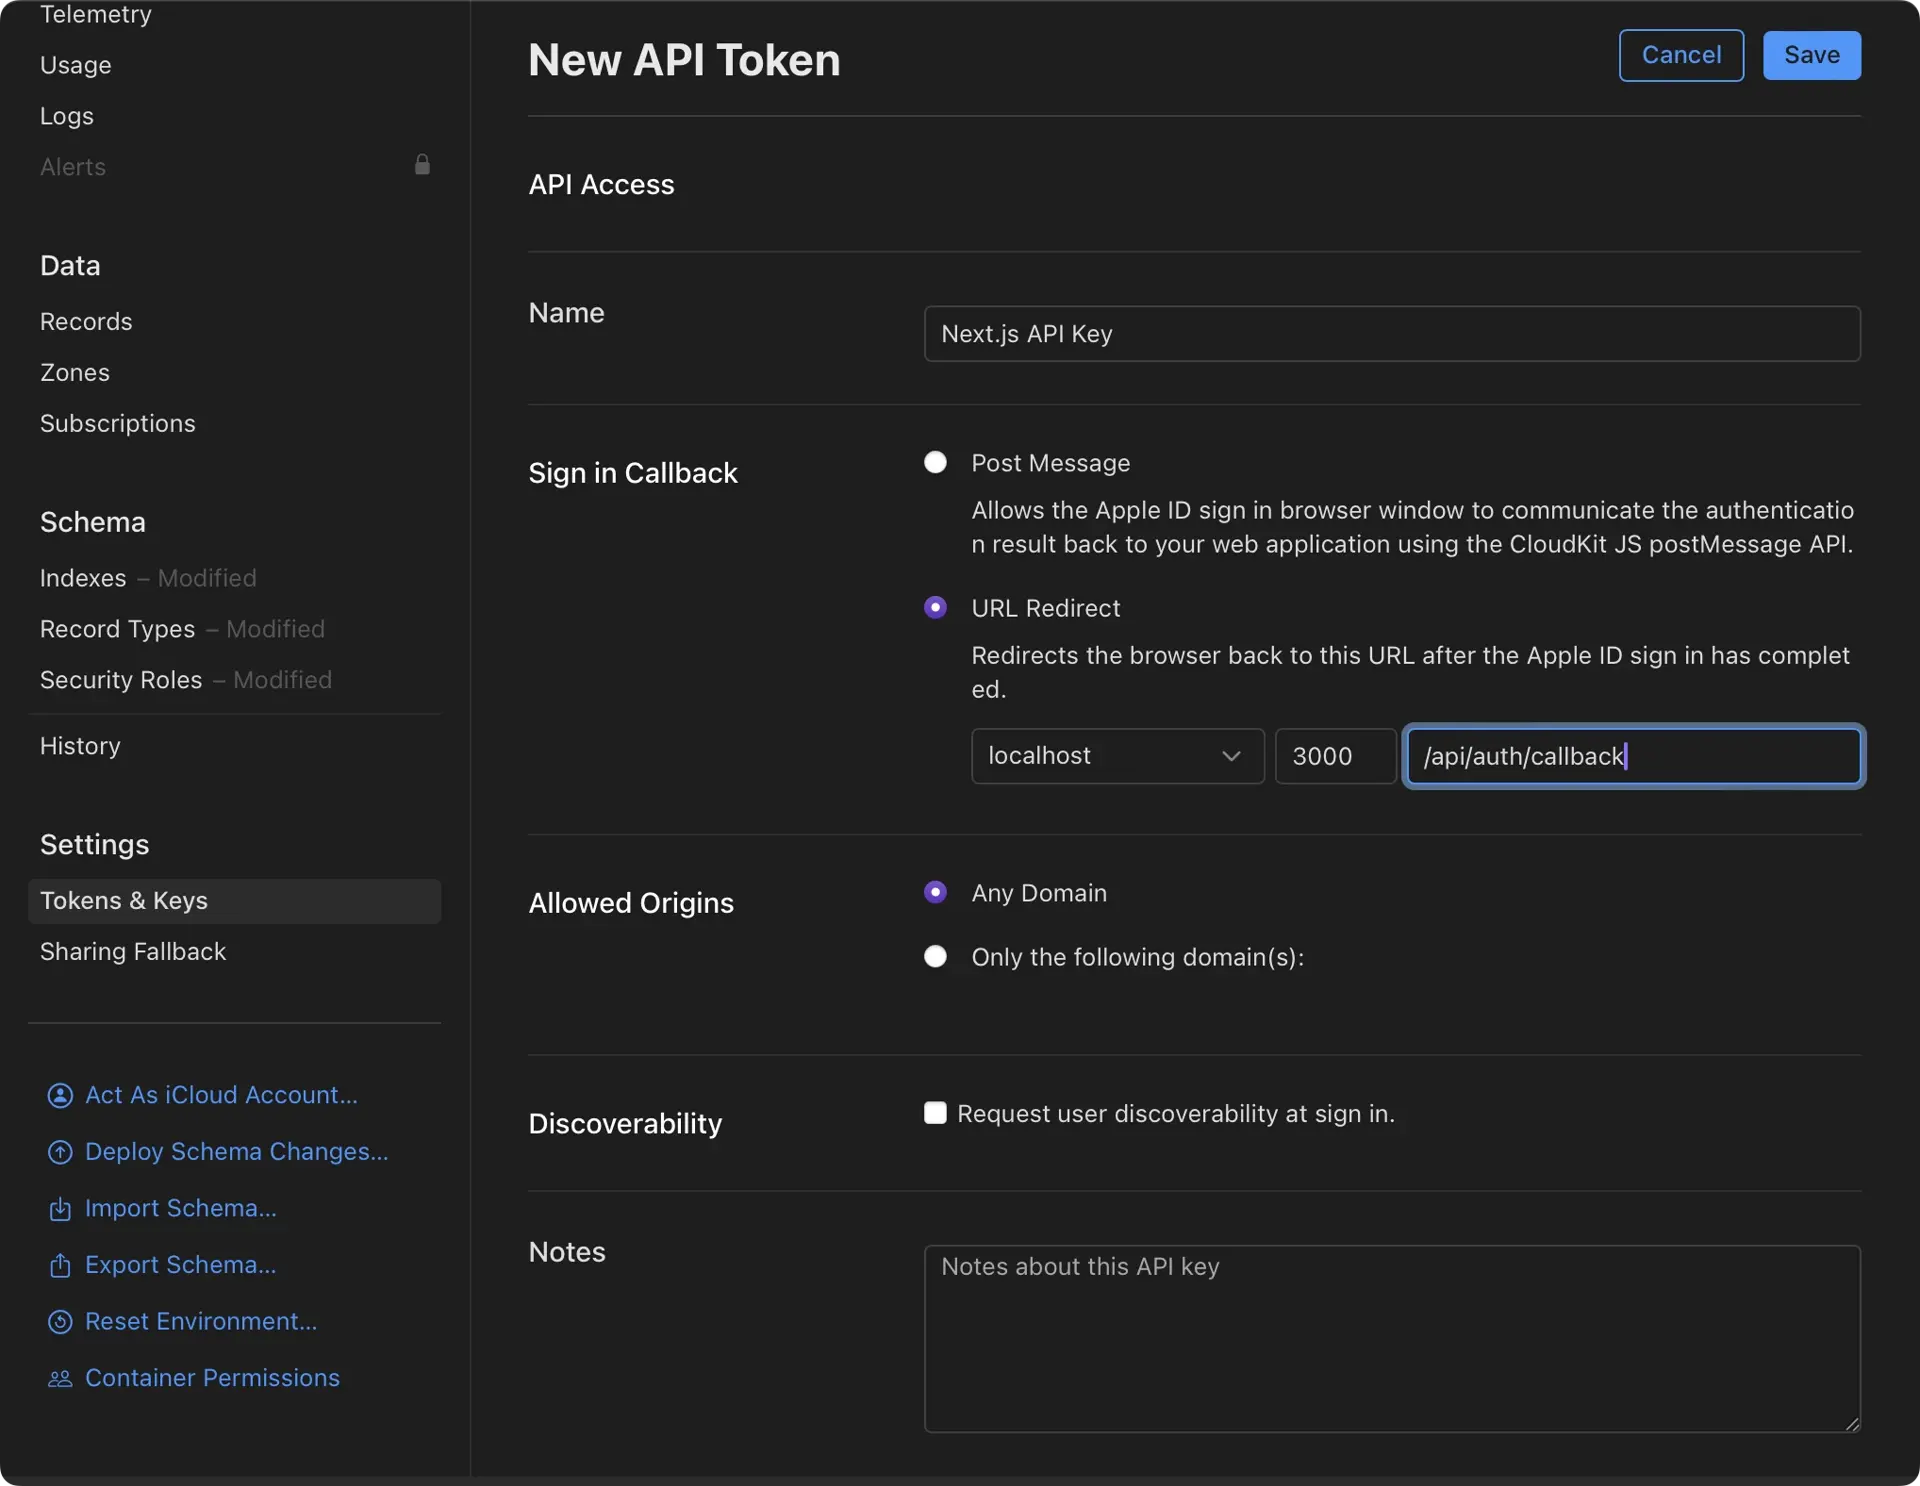
-
Save the API key in a secure place.
It is very important to keep the API key confidential. Never share or publish your API key.
Step 3 — Integrating CloudKit Web Services
Now we we will start integrating CloudKit into our Next.js web application using CloudKit Web Services API. We will start with authentication, create API endpoints, and finally call the API from the client side (frontend).
Environment Variables
Some important data is needed to integrate CloudKit. Store all this data below in environment variables.
- Apple CloudKit API Key - This is sensitive data and should only be used on the server. Never include it in the client bundle.
- Container - Your app's bundle ID name.
- Environment - Choose between
developmentorproduction. As the name suggests, usedevelopmentduring the development process. When you are ready to release, useproduction.
Here is an example .env file:
APPLE_CK_API_KEY=<api_key>
APPLE_CK_CONTAINER=iCloud.com.example.Todo
APPLE_CK_ENVIRONMENT=development
To be able to perform a request to CloudKit, we need its API URL. The API URL format is like this:
const API_URL = `https://api.apple-cloudkit.com/database/1/${container}/${environment}/private`${container}: The value will beAPPLE_CK_CONTAINER.${environment}: The value will beAPPLE_CK_ENVIRONMENT./private: Indicates to CloudKit that we only need to access the CloudKit Private Database.
Save this URL in a separate JavaScript file that can be easily imported.
Authentication
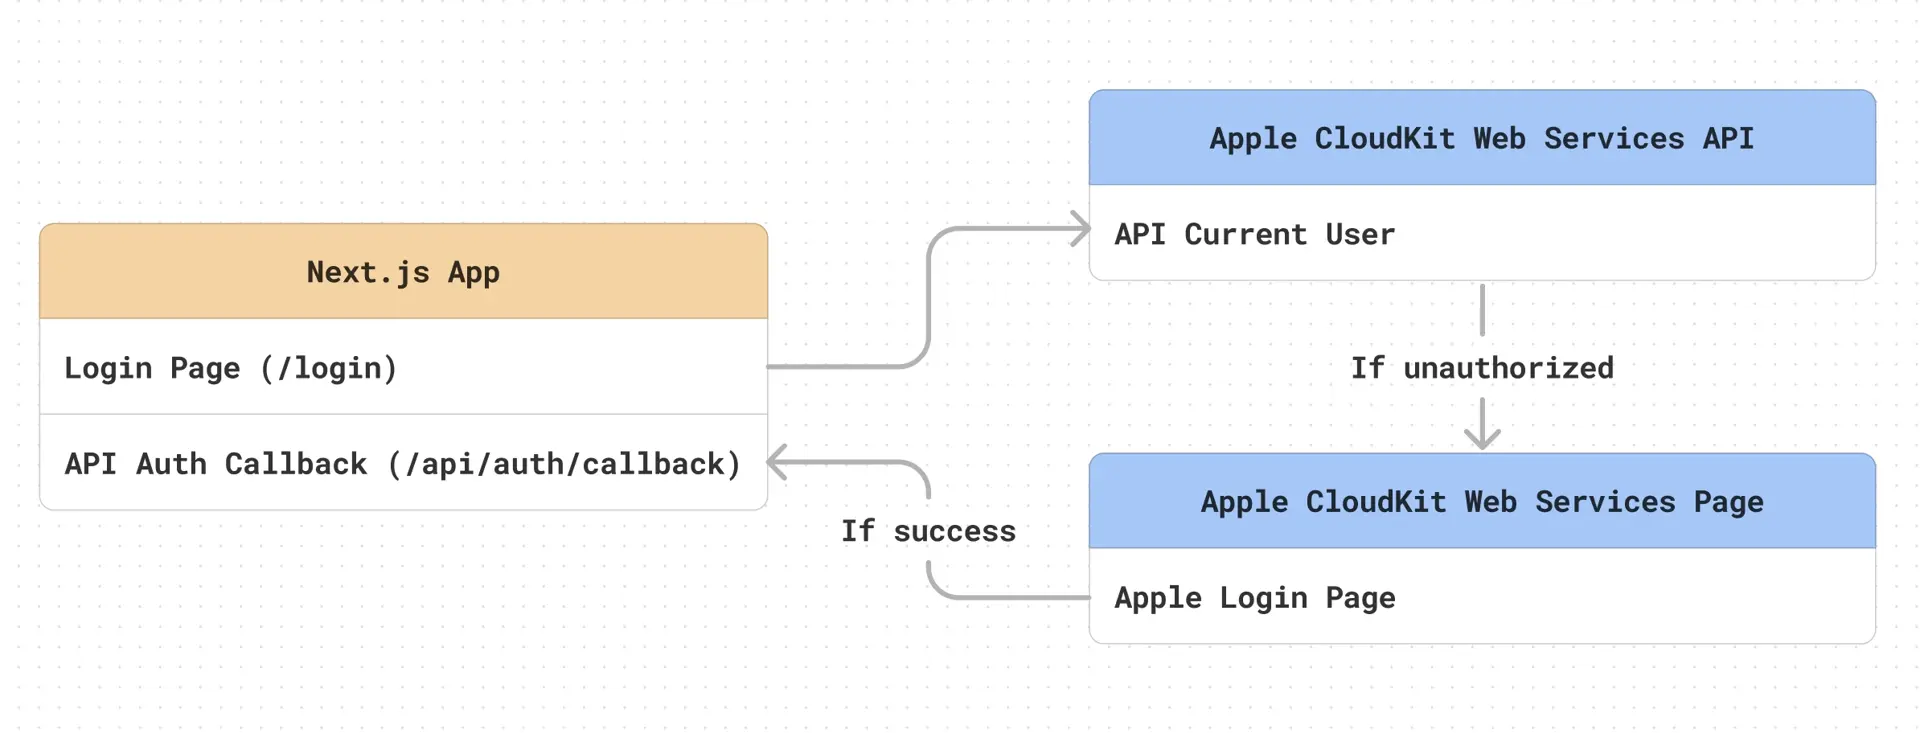
CloudKit Web Services authentication is quite simple. Here are the steps:
Backend (Server)
-
Login Request: First, we will make a request to
/users/currentAPI to perform login. We need to create an API endpoint on the server side to make this request../pages/api/auth/login.js // API is accessible at `/api/auth/login` export default async function loginHandler(req, res) { // HTTP method validation. // Only GET request will be executed. // Other methods will return HTTP status 405: Method not allowed. if (req.method !== 'GET') { res.status(405).json('Method not allowed.') return } // Start the login request. try { // Use API_URL that we already created. // And use APPLE_CK_API_KEY that existed in environment variables. const loginRequestUrl = `${API_URL}/users/current?ckAPIToken=${process.env.APPLE_CK_API_KEY}` const fetchResponse = await fetch(loginRequestUrl) const json = await fetchResponse.json() res.json(json) } catch (e) { res.status(500).json(e) } }For more detailed information about the
/users/currentAPI, check out the full API documentation. -
Auth Callback Handler: Next, we also need to create an API endpoint to handle the callback provided by Apple. We need to install an additional library called cookies-next to make managing cookies in the server easier.
./pages/api/auth/callback.js // API is accessible at `/api/auth/callback` import { setCookie } from 'cookies-next' export default async function callbackHandler(req, res) { // HTTP method validation. // Only GET request will be executed. // Other methods will return HTTP status 405: Method not allowed. if (req.method !== 'GET') { res.status(405).json('Method not allowed.') return } // We get the `ckWebAuthToken` from URL query string. const ckWebAuthToken = req.query.ckWebAuthToken // If `ckWebAuthToken` is missing, // return HTTP status 500. if (!ckWebAuthToken) { res.status(500).json('Missing auth token') return } // Save the `ckWebAuthToken` into cookies. setCookie('ckWebAuthToken', ckWebAuthToken as string, { req, res }) // Redirect to the main page. res.redirect(307, '/') }
Frontend (Client)
Now we will implement the frontend part and connect it to the API endpoints we have created. First, create the pages. For example, I will create 2 pages: / as the main page, and /login.
Next, we will focus on the login page. Let's connect the page with the login API that we have created.
export default function Login() {
  const handleLogin = async () => {
    try {
      const res = await fetch('/api/auth/login')
      const json = await res.json()

      /**
       * If not logged in, the API response
       * would be something like this:
       * {
       *   serverErrorCode: 'AUTHENTICATION_REQUIRED',
       *   redirectUrl: '<url>',
       *   ...
       * }
       *
       * If `serverErrorCode` = 'AUTHENTICATION_REQUIRED',
       * redirect users to the Apple login page
       * that is provided in `redirectUrl`.
       */
      if (json.serverErrorCode === 'AUTHENTICATION_REQUIRED') {
        window.location.href = json.redirectURL
        return
      }

      // Add other code to handle logged in state.
      // ...
    } catch (e) {
      console.log(e)
    }
  }

  return (
    <div>
      <h1>Login Page</h1>
      <button onClick={handleLogin}>Login</button>
    </div>
  )
}
After users successfully log in, Apple will redirect them to our callback API endpoint (/api/auth/callback). From there, users will be redirected back to the main page.
But currently, we can still directly access the main page even if we are not logged in. So we need to add protection to the page using Next.js Middleware.
// Put this file in the root folder of your Next.js project.

import { NextResponse } from 'next/server'

export function middleware(request) {
  // To check if the users is logged in or not.
  // If not, redirect to the login page.
  if (request.nextUrl.pathname !== '/login') {
    const isTokenExist = request.cookies.has('ckWebAuthToken')

    if (!isTokenExist) {
      return NextResponse.redirect(new URL('/login', request.url))
    }
  }

  // If users logged in, but they access the login page,
  // redirect them to the main page.
  if (request.nextUrl.pathname === '/login') {
    const isTokenExist = request.cookies.has('ckWebAuthToken')

    if (isTokenExist) {
      return NextResponse.redirect(new URL('/', request.url))
    }
  }
}

export const config = {
  matcher: [
    // A matcher to ensure the middleware only runs on client-side pages.
    '/((?!api|_next/static|_next/image|favicon.ico).*)',
  ],
}
Accessing Data
After successfully authenticating, we can start accessing CloudKit data. There are important things to note:
-
Security
- All requests to CloudKit Web Services must be made from the server-side.
APPLE_CK_API_KEYdata in environment variables should not be used on the client-side. If you put it on the client-side, you are exposing it to the public.- We have already stored the
ckWebAuthTokendata in cookies and it can be accessed by the server. So we don't need to send it from the client.
-
Implementation
- With Next.js, we can use API Routes (server) to safely handle requests to CloudKit Web Services.
- The steps below only show you the basic way to make requests to CloudKit Web Services. You need to add other things like validation and other security measures as needed.
Querying Data
To query data, we can use /records/query API. Here's an example of the API endpoint:
// API is accessible at `/api/todos`

import { getCookie } from 'cookies-next'

export default async function getTodos(req, res) {
  // HTTP method validation.
  // Only GET request will be executed.
  // Other methods will return HTTP status 405: Method not allowed.
  if (req.method !== 'GET') {
    res.status(405).json('Method not allowed.')
    return
  }

  // Validate `ckWeabAuthToken`.
  const rawToken = getCookie('ckWebAuthToken', { req, res })

  if (!rawToken) {
    res.status(401).json('Unauthorized')
    return
  }

  const encodeToken = encodeURIComponent(rawToken)

  // Request payload.
  const requestPayload = {
    zoneID: { zoneName: 'com.apple.coredata.cloudkit.zone' },
    query: {
      recordType: 'CD_Todo',
      sortBy: [{ fieldName: 'CD_createdAt', ascending: false }],
    },
  }

  try {
    const fetchResponse = await fetch(
      `${API_URL}/records/query?ckAPIToken=${process.env.APPLE_CK_API_KEY}&ckWebAuthToken=${encodeToken}`,
      {
        method: 'POST',
        body: JSON.stringify(requestPayload),
      },
    )
    const json = await fetchResponse.json()

    // If there's an error while fetching the data,
    // return the error to the client-side.
    if (!fetchResponse.ok) {
      throw json
    }

    // If the session time has expired,
    // return an error to the client-side.
    // This allows for re-authentication.
    if (json.serverErrorCode === 'AUTHENTICATION_REQUIRED') {
      throw json
    }

    if (json.records) {
      // Cleaning up the data so it can be directly used by the frontend (client-side)
      const todosToDisplay = json.records
        .filter((record) => !record.deleted)
        .map((record) => ({
          id: record.recordName,
          recordChangeTag: record.recordChangeTag,
          title: record.fields.CD_title.value,
          isCompleted: Boolean(record.fields.CD_isCompleted.value), // raw value: '1' || '0'
        }))

      res.json(todosToDisplay)
      return
    }
  } catch (e) {
    res.status(500).json(e)
  }
}
Some important points in the request payload:
-
zoneID.zoneNameThis field is required. Fill in with
com.apple.coredata.cloudkit.zoneto fetch data from the same record zone we used in our native app. -
queryThis field is required. It is an object that can be filled with our desired query. In the example above, I'm fetching data from
CD_Todorecord type, and sorting it by the newestCD_createdAt(ascending: false). For details on other query requests like filters (where clause), check out the full API documentation.
Next is the response from this API. There are quite a few details that we don't need in our frontend. So we only need these 3 things:
-
record.recordNameApple uses
recordNameas a unique identifier for each data. We will use this data to display and manipulate that data. -
record.recordChangeTagApple uses this field for data change management in the “local-first” principle. We must include this tag when making changes or deletions to data, so Apple can track the changes.
-
record.fieldsThis data contains the main data we store. For example, we store
title&isCompletedas in the example above, we can access them in therecord.fields.
For more detailed information about the /records/query API, check out the full API documentation.
Manipulating Data
To manipulate data in CloudKit, we use the /records/modify API. This API allows us to create, update, and delete data. If needed, this API also can perform bulk operations.
This is the basic request payload format for the /records/modify API:
const requestPayload = {
  zoneID: { zoneName: 'com.apple.coredata.cloudkit.zone' },
  operations: [
    // ... list of operations
    // ... add, edit, delete data
  ],
}
The operations field is an array. This enables us to do bulk operations in one request. All operations will have a similar format as above, with the only difference being the content of the operations field.
Adding Data
To add new data, we can put it in the operations field like this:
// API is accessible at `/api/todos/create`

export default async function createTodo(req, res) {
  // HTTP method validation.
  // Only POST request will be executed.
  // Other methods will return HTTP status 405: Method not allowed.
  if (req.method !== 'POST') {
    res.status(405).json('Method not allowed.')
    return
  }

  // Validate `ckWeabAuthToken`.
  const rawToken = getCookie('ckWebAuthToken', { req, res })

  if (!rawToken) {
    res.status(401).json({ data: null, error: 'Unauthorized' })
    return
  }

  const encodeToken = encodeURIComponent(rawToken)

  // Retrieve data from the request body sent by the frontend.
  const data = JSON.parse(req.body)

  const addTodo = {
    operationType: 'create',
    record: {
      recordType: 'CD_Todo',
      fields: {
        CD_title: { value: data.title },
        CD_isCompleted: { value: data.isCompleted },
        CD_createdAt: { value: Date.now() },
        CD_entityName: { value: 'Todo' },
      },
    },
  }

  const requestPayload = {
    zoneID: { zoneName: 'com.apple.coredata.cloudkit.zone' },
    operations: [addTodo],
  }

  try {
    const fetchResponse = await fetch(
      `${API_URL}/records/modify?ckAPIToken=${process.env.APPLE_CK_API_KEY}&ckWebAuthToken=${encodeToken}`,
      {
        method: 'POST',
        body: JSON.stringify(requestPayload),
      },
    )
    const json = await fetchResponse.json()

    if (!fetchResponse.ok) {
      throw json
    }

    res.json(json)
  } catch (e) {
    res.status(500).json(e)
  }
}operationType- To add new data, use 'create' operation type.record.recordType- The name of the table used. In this example, I'm usingCD_Todotable.record.fields- The data that we want to store, which must conform to the existing schema in CloudKit.- Note the additional field:
CD_entityName, which has the same value asrecord.recordTypebut without theCD_prefix, so justTodo.
- Note the additional field:
Learn more about adding data in the API documentation.
Modifying Data
To modify data, we can put it in the operations field like this:
// API is accessible at `/api/todos/update`

export default async function updateTodo(req, res) {
  // HTTP method validation.
  // Only PUT request will be executed.
  // Other methods will return HTTP status 405: Method not allowed.
  if (req.method !== 'PUT') {
    res.status(405).json('Method not allowed.')
    return
  }

  // Validate `ckWeabAuthToken`.
  const rawToken = getCookie('ckWebAuthToken', { req, res })

  if (!rawToken) {
    res.status(401).json({ data: null, error: 'Unauthorized' })
    return
  }

  const encodeToken = encodeURIComponent(rawToken)

  // Retrieve data from the request body sent by the frontend.
  const data = JSON.parse(req.body)

  const updateTodo = {
    operationType: 'update',
    record: {
      recordName: data.id,
      recordChangeTag: data.recordChangeTag,
      fields: {
        CD_title: { value: data.title },
        CD_isCompleted: { value: data.isCompleted ? 1 : 0 },
      },
    },
  }

  const requestPayload = {
    zoneID: { zoneName: 'com.apple.coredata.cloudkit.zone' },
    operations: [updateTodo],
  }

  try {
    const fetchResponse = await fetch(
      `${API_URL}/records/modify?ckAPIToken=${process.env.APPLE_CK_API_KEY}&ckWebAuthToken=${encodeToken}`,
      {
        method: 'POST',
        body: JSON.stringify(requestPayload),
      },
    )
    const json = await fetchResponse.json()

    if (!fetchResponse.ok) {
      throw json
    }

    res.json(json)
  } catch (e) {
    res.status(500).json(e)
  }
}
The process of modifying data is similar to adding data, but with some important differences:
operationType: 'update'- To update existing data, use 'update' operation type.record.recordName- Include the ID that you want to modify.record.recordChangeTag- Include the 'recordChangeTag' of the data you want to modify.record.fields- Only include the fields you want to change. There's no need to include all data if you only want to modify the data partially.
Learn more about modifying data in the API documentation.
Deleting Data
To delete data, we can put it in the operations field like this:
// API is accessible at `/api/todos/delete`

export default async function deleteTodo(req, res) {
  // HTTP method validation.
  // Only DELETE request will be executed.
  // Other methods will return HTTP status 405: Method not allowed.
  if (req.method !== 'DELETE') {
    res.status(405).json('Method not allowed.')
    return
  }

  // Validate `ckWeabAuthToken`.
  const rawToken = getCookie('ckWebAuthToken', { req, res })

  if (!rawToken) {
    res.status(401).json({ data: null, error: 'Unauthorized' })
    return
  }

  const encodeToken = encodeURIComponent(rawToken)

  // Retrieve data from the request body sent by the frontend.
  const data = JSON.parse(req.body)

  const deleteTodo = {
    operationType: 'delete',
    record: {
      recordName: data.id,
      recordChangeTag: data.recordChangeTag,
    },
  }

  const requestPayload = {
    zoneID: { zoneName: 'com.apple.coredata.cloudkit.zone' },
    operations: [deleteTodo],
  }

  try {
    const fetchResponse = await fetch(
      `${API_URL}/records/modify?ckAPIToken=${process.env.APPLE_CK_API_KEY}&ckWebAuthToken=${encodeToken}`,
      {
        method: 'POST',
        body: JSON.stringify(requestPayload),
      },
    )
    const json = await fetchResponse.json()

    if (!fetchResponse.ok) {
      throw json
    }

    res.json(json)
  } catch (e) {
    res.status(500).json(e)
  }
}
As before, the only code that changes is inside the operations field. For deletion, the information sent is simpler:
operationType: 'delete'- To delete existing data, use 'delete' operation type.record.recordName- Include the ID that you want to delete.record.recordChangeTag- Include the 'recordChangeTag' of the data you want to delete.
Learn more about deleting data, disini.
Using Data in the Frontend
After implementing all APIs for CRUD (Create, Read, Update, Delete) operations, now we can use them in the frontend. I will only show you examples, so you can get an idea of how to use them.
Important Note: The following examples are only for illustration purposes and not recommended for production use. I suggest using a library like @tanstack/react-query or swr to make managing async API calls easier.
Querying Data
To query data, use /api/todos API that we have created. For example:
import { useQuery } from '@tanstack/react-query'

export default function MainPage() {
  const { data, isLoading, isError, error } = useQuery({
    queryKey: ['todos'],
    queryFn: async () => {
      const res = await fetch('/api/todos')
      const json = await res.json()

      if (!res.ok) throw json

      return json
    },
  })

  return (
    <div>
      {isLoading ? (
        <div>Loading...</div>
      ) : data.length > 0 ? (
        <div>
          {data.map((todo: any, index: number) => (
            <TodoItem
              key={todo.id}
              isFirstItem={index === 0}
              isLastItem={index === data.length - 1}
              todo={todo}
            />
          ))}
        </div>
      ) : null}
    </div>
  )
}
Adding Data
To add data, use /api/todos/create API that we have created. For example:
import { useMutation } from '@tanstack/react-query'

export default function AddTodoForm() {
  const createTodoMutation = useMutation({
    mutationFn: async (data) => {
      const res = await fetch('/api/todos/create', {
        method: 'POST',
        body: JSON.stringify(data),
      })
      const json = await res.json()

      if (!res.ok) throw json

      return json
    },
    onSuccess: (data) => {
      // ... Refresh Data ...

      // Reset form
      formRef.current?.reset()
    },
    onError: (error) => console.log(error),
  })

  const onSubmit = async (e) => {
    e.preventDefault()

    const formData = new FormData(e.currentTarget)
    const data = Object.fromEntries(formData)

    if (!data.title) return

    const formattedData = { ...data, isCompleted: 0 }

    createTodoMutation.mutate(formattedData)
  }

  return (
    <div>
      <form
        ref={formRef}
        className="mb-4 flex gap-2 rounded-lg border bg-white px-3"
        onSubmit={onSubmit}
      >
        <div className="flex-1">
          <input
            required
            name="title"
            placeholder="Todo Title"
            className="w-full py-2 focus:outline-none"
            disabled={createMutation.isPending}
          />
        </div>

        <button
          type="submit"
          className="shrink-0 px-2 font-semibold text-[#007AFF] active:opacity-50 disabled:text-neutral-500"
          disabled={createMutation.isPending}
        >
          {createMutation.isPending ? 'Saving...' : 'Save'}
        </button>
      </form>
    </div>
  )
}
Modifying & Deleting Data
-
To modify data, use
/api/todos/updateAPI that we have created. For example:import { useMutation } from '@tanstack/react-query' export default function UpdateTodo({ todo }) { const updateMutation = useMutation({ mutationFn: async (data) => { const res = await fetch(`/api/todos/update`, { method: 'PUT', body: JSON.stringify(data), }) const json = await res.json() if (!res.ok) throw json return json }, onSuccess: (data) => { // ... Refresh Data ... }, onError: (error) => console.log(error), }) const onUpdate = (e) => { e.preventDefault() const formData = new FormData(e.currentTarget) const data = Object.fromEntries(formData) if (!data.title) return const formattedData = { ...data, id: todo.id, recordChangeTag: todo.recordChangeTag, } updateMutation.mutate(formattedData) } return <form onSubmit={onUpdate}>...</form> } -
To delete data, use
/api/todos/deleteAPI that we have created. For example:import { useMutation } from '@tanstack/react-query' export default function DeleteTodo({ todo }) { const deleteMutation = useMutation({ mutationFn: async (data) => { const res = await fetch(`/api/todos/delete`, { method: 'DELETE', body: JSON.stringify(data), }) const json = await res.json() if (!res.ok) throw json return json }, onSuccess: (data) => { // ... Refresh Data ... }, onError: (error) => console.log(error), }) const onDelete = () => { deleteMutation.mutate({ id: todo.id, recordChangeTag: todo.recordChangeTag, }) } return <button onClick={onDelete}>...</button> }
Please remember that these examples are basic implementations. In the production application, you need to add error handling, loading states, and optimize the performance. Using state management and data-fetching libraries can be very helpful in managing this complexity.
Conclusion
Integrating CloudKit Web Services into a web application turned out to be not as complicated as I had imagined. The key to success lies in the perseverance in exploring and understanding the documentation provided by Apple.
This write-up is the result of developing what I learned from Apple's official documentation. For those of you who are serious about developing web applications with CloudKit, I highly recommend spending more time learning the documentation thoroughly
For a more complete and comprehensive implementation reference, I have provided the code on GitHub. However, keep in mind that this code is only for the development environment and hasn't been thoroughly tested for the production environment. If you intend to use it, do so wisely — add security features and additional testing. In short, Do With Your Own Risk (DWYOR).
If you have questions or need further explanation, don't hesitate to reach out to me on Twitter/X. Good luck!